Train a Model
You can get started with model training upon labeling. This topic describes how to configure training parameters, train models, and view training information in the Training tab.
Configure Training Parameters
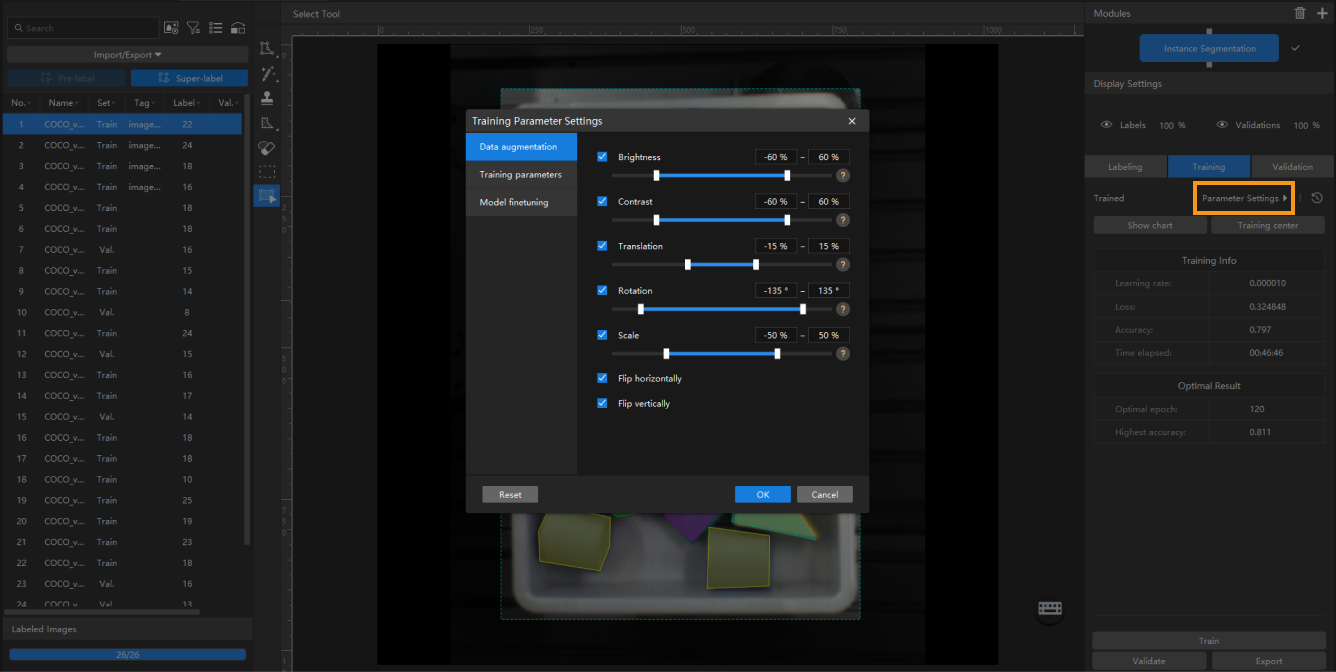
Before you start the training, you should configure the training parameters for the deep learning model. You can click the Parameter Settings button to open the Training Parameter Settings window, and configure Data augmentation, Training Parameters, and Model finetuning (Developer Mode only) parameters.
| Fine-tuning the parameters of a deep learning model to achieve high performance can be an elaborate work. It is recommended that you use the default values provided by Mech-DLK for the initial training, which are suitable for most application scenarios. |

Data Augmentation
The data for training the model needs to contain as much as possible all situations that may actually occur. If the site does not have the corresponding data-acquiring conditions, you can adjust the Data Enhancement parameters to prepare data that can not be acquired, thus enriching the training data. It must be ensured that the augmented image data should conform to the on-site situation. If there are no rotations on the site, then there is no need to adjust the parameter “Rotation”; otherwise, the model’s performance may be affected.
|
Hover the mouse cursor over |
-
Brightness
It refers to how much light is present in the image. When the on-site lighting changes greatly, by adjusting the brightness range, you can augment the data to have larger variations in brightness.
-
Contrast
Contradiction in luminance or color. When the objects are not obviously distinct from the background, you can adjust the contrast to make the object features more obvious.
-
Translation
Add the specified horizontal and vertical offsets to all pixel coordinates of the image. When the positions of on-site objects (such as bins and pallets) move in a large range, by adjusting the translation range, you can augment the data in terms of object positions in images.
-
Rotation
Rotate an image by a certain angle around a certain point to form a new image. In general, keeping the default parameters can meet the requirements. When the object orientations vary greatly, by adjusting the rotation range, you can augment the image data to have larger variations in object orientations.
-
Scale
Shrink or enlarge an image by a certain scale. When object distances from the camera vary greatly, by adjusting the scale range parameter, you can augment the data to have larger variations in object proportions in the images.
-
Flip horizontally
Flips the image 180° left to right. If the objects to be recognized have left-right symmetry, you can select the Flip horizontally check box.

-
Flip vertically
Flips the image 180° upside down. If the objects to be recognized have vertical symmetry, you can select the Flip vertically check box.

Training Parameters
-
Input image size
The pixel-wise height and width of the image input to the neural network for training. It is recommended to use the default setting, but if the objects or defect regions in the images are small, you need to increase the input image size. The larger the image size, the higher the model accuracy, but the lower the training speed.
-
Batch size
The number of samples selected for each time of neural network training. It is recommended to use the default settings; if you need to increase the training speed, you can appropriately increase the batch size. If the batch size is set too large, memory usage will increase.
-
Model type
Defect Segmentation
Normal
The Normal mode is suitable for most application scenarios.
Instance Segmentation
Normal (better with GPU deployment)
Suitable for scenarios that require high accuracy. This mode may result in slower training speed.
Lite (better with CPU deployment)
Suitable for scenarios that require high training speed.
-
Eval. interval
The number of epochs for each evaluation interval during model training. It is recommended to use the default setting. Increasing the Eval. interval can increase the training speed. The larger the parameter, the faster the training; the smaller the parameter, the slower the training, but a smaller value helps select the optimal model.
-
Epochs
The total number of epochs of model training. It is recommended to use the default setting. If the features of objects to be recognized are complex, it is necessary to increase the number of training epochs appropriately to improve the model performance, but increasing the number of epochs will lead to longer training time.
It is not true that the bigger the number of epochs, the better. When the total number of epochs is set to be large, the model will continue to be trained after the accuracy stabilizes, which will result in a longer training time and the risk of overfitting. -
Learning rate
The learning rate sets the step length for each iteration of optimization during neural network training. It is recommended to use the default setting. When the loss curve shows a slow convergence, you can appropriately increase the learning rate; if the accuracy fluctuates greatly, you can appropriately decrease the learning rate.
-
GPU ID
Graphics card information of the model deployment device. If multiple GPUs are available on the model deployment device, the training can be performed on a specified GPU.
-
Model simplification
This option is used to simplify the neural network structure. It is not checked by default. When the training data is relatively simple, checking the option can improve the training and inference speeds.
-
Max num of training objects
This option is to limit the maximum number of objects that can be recognized during training. It is not checked by default. In general, setting this parameter can speed up inference. Under certain circumstances, setting this parameter can help reduce GPU usage.
Model Finetuning
When a model is put into use for some time, it might not cover certain scenarios. At this point, the model should be iterated. Usually, using more data to re-train the model can do the job, but it could reduce the overall recognition accuracy and might take a long time. Hence, Model Finetuning can be used to iterate the model while maintaining its accuracy and saving time.
| This feature only works under the Developer Mode. |
You can use the following method to fine-tune the model:
-
Acquire images that report poor recognition results.
-
Use Mech-DLK to open the project the model belongs to.
-
Enable the Developer Mode by clicking .
-
Add the acquired images into the training and validation sets.
-
Label the newly added images.
-
Click and then enable Finetune.
-
In the Training Parameters tab, lower the Learning rate properly. The Epochs can be reduced to 50–80.
-
Click OK to save the parameter settings.
-
Complete model training and export the model.
| You can enable Model Finetuning and then select the path of a super model in the Training parameter settings window of the Instance Segmentation module to finetune the super model. |
Start Training
After you confirm the parameter settings, you can click Train on the lower part of the Training tab to start training the model.
Training Center
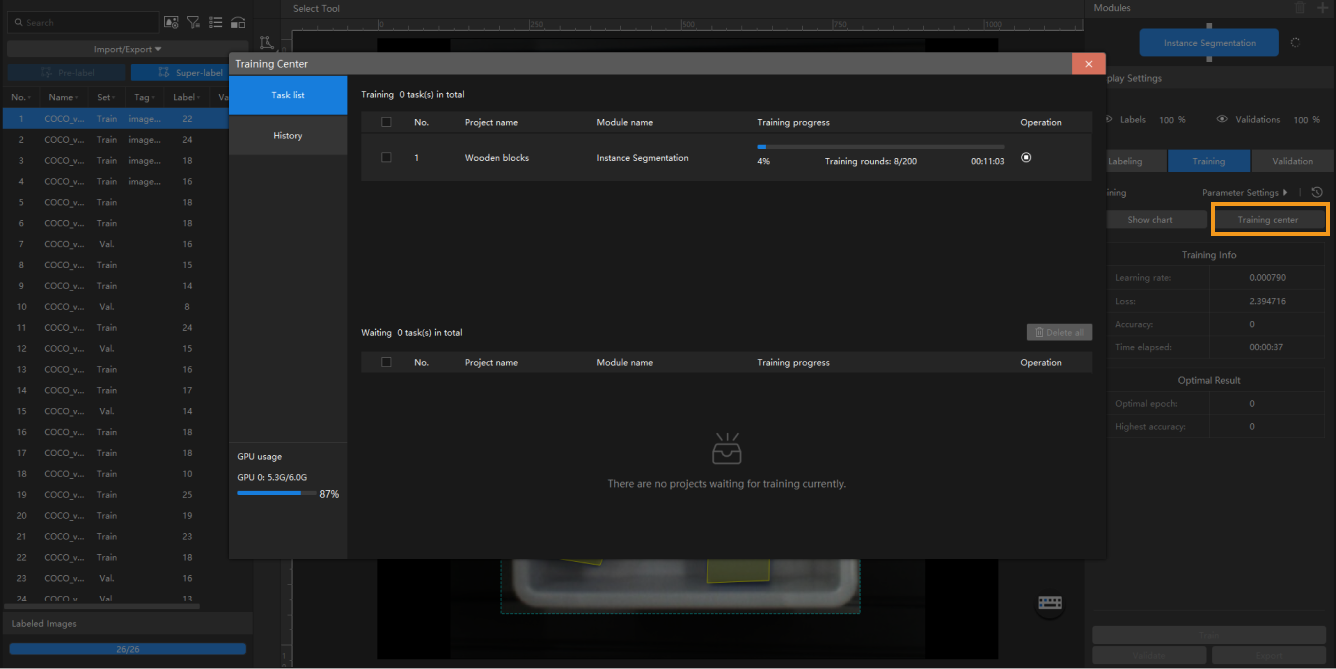
You can view the training progress and memory usage in the Training Center.
If there is already a training task in progress, other training tasks will enter a waiting queue.

-
Click
 to terminate the training task in progress.
 -
Click
 to remove the training task from the waiting queue.
 -
Click
 to stick the training task to the top of the waiting queue.
View Training Information
-
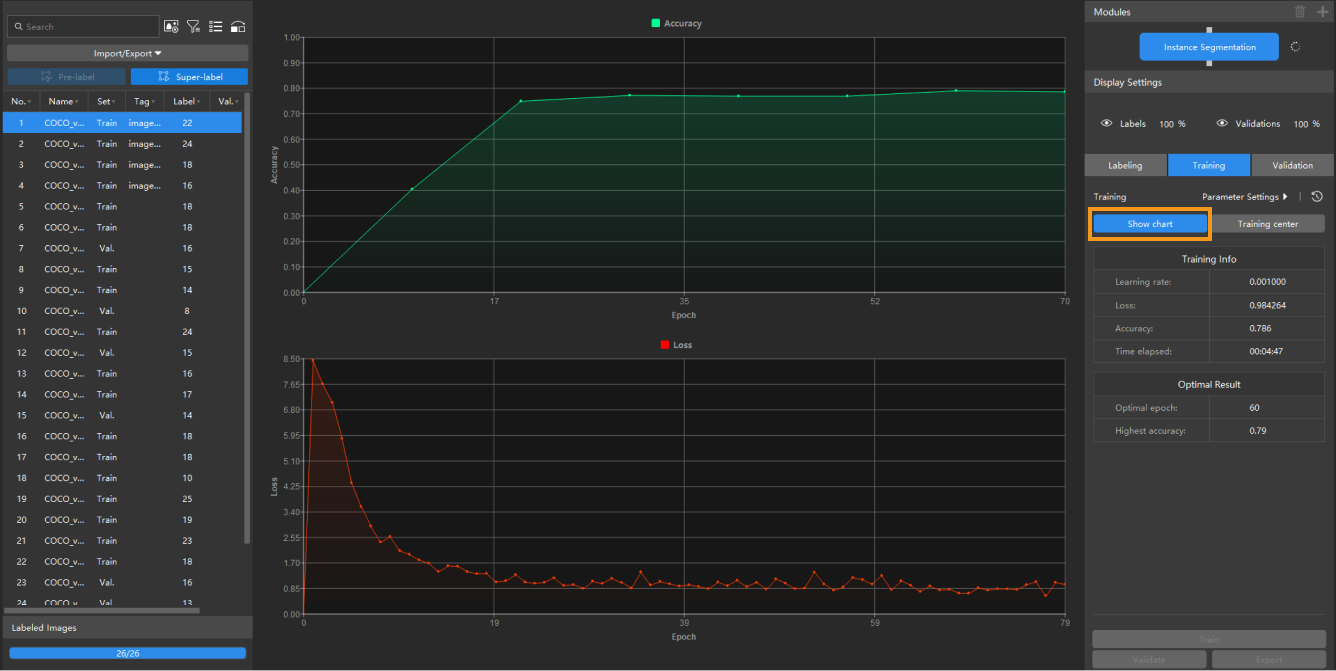
The Training tab displays real-time training information and the optimal results achieved during the training task.
-
In the Training tab, you can click the Show chart button to switch to the training chart. The chart dynamically displays changes in training accuracy and loss parameters as training epochs progress. Click the Show chart button again to switch to the image.
