Control Data Acquisition with External Device
This topic introduces how to control the laser profiler to acquire data with an external device, in order to integrate the laser profiler into a system.
|
Relevant Input Signal Terminals
When an external device is used to control the laser profiler to acquire data, the signal wires of the external device must be connected to the corresponding input signal terminals of the laser profiler controller, in order to provide the signals for controlling data acquisition to the laser profiler.
The following input signal terminals are discussed in this topic:
| No. | Name |
|---|---|
9 |
LEVELCONTROL_ENABLE |
10 |
MEASURE_START |
11 |
MEASURE_STOP |
Among these, the LEVELCONTROL_ENABLE terminal determines the method of controlling data acquisition, and the MEASURE_START and MEASURE_STOP terminals are used to input the signals for controlling data acquisition.
There are three ways to control data acquisition with signals from an external device:
-
Control the start of data acquisition with the signal from the MEASURE_START terminal, and control the end of data acquisition with the Scan Line Count parameter.
ExampleThe dimensions of the target object and the start position for scanning are fixed. When the target object arrives at the start position for scanning, it blocks the light from the optoelectronic switch, and the optoelectronic switch sends a signal to the laser profiler to start data acquisition. After scanning the set number of lines, the laser profiler stops acquiring data.
-
Control the start and end of data acquisition with the signals from the MEASURE_START terminal only.
ExampleMultiple types of target objects with different dimensions are to be scanned. When the target object arrives at the start position of scanning, it starts to block the light from the optoelectronic switch, and the optoelectronic switch sends a signal to the laser profiler to start data acquisition. The target object continues to move forward until it no longer blocks the light from the optoelectronic switch. At this moment, the laser profiler stops data acquisition according to the change in the signal from the optoelectronic switch.
-
Control the start and end of data acquisition with the signals from the MEASURE_START and MEASURE_STOP terminals, respectively.
ExampleThe target object is long, and several segments of interest are to be scanned. Based on the position of the target object, two I/O signal terminals of an PLC flexibly control the start and end of data acquisition.
The following sections explain the above three ways to control data acquisition.
|
The HIGH and LOW level signals in this topic are defined as follows:
|
Control Data Acquisition with MEASURE_START and Scan Line Count
Control the start of data acquisition with the signal from the MEASURE_START terminal, and control the end of data acquisition with the Scan Line Count parameter.
Please follow the example below to connect the signal wires and provide signals for controlling data acquisition to the laser profiler.
-
Connect the signal wires of the external device to the following terminals on the controller:
-
Connect one of the common terminals for input signal (terminals 13 to 16).
-
Connect the MEASURE_START terminal (terminal 10), and ensure that a LOW level signal is input before data acquisition starts (initial status).
-
The terminals on the controller are numbered. Please connect the corresponding terminals according to the number.
-
For the signal circuit diagrams, please refer to Signal Circuit Diagrams.
-
-
Referring to the following figure and table, set an appropriate value for the Scan Line Count parameter and adjust the logic level signal from the MEASURE_START terminal at the appropriate time to control the start and end of data acquisition:

No. Data acquisition action Terminal and signal Duration requirements ①
Start a round of data acquisition
Change the logic level of the MEASURE_START terminal signal from LOW to HIGH, and then change the logic level back to LOW.
Ensure that the HIGH level of the MEASURE_START terminal signal lasts for at least 100 ms.
②
End the current round of data acquisition
Data acquisition ends automatically when the laser profiler finishes acquiring the number of profiles set in the Scan Line Count parameter.
-
③
Start the next round of data acquisition
Change the logic level of the MEASURE_START terminal signal from LOW to HIGH, and then change the logic level back to LOW.
-
Ensure that interval between the two rising edges of the MEASURE_START terminals is long enough.
The required interval depends on Scan Line Count and the scan rate. When Scan Line Count and the scan rate are at their maximum values, the required interval can be up to 3 to 4 s. -
Ensure that the HIGH level of the MEASURE_START terminal signal lasts for at least 100 ms.
④
End the current round of data acquisition
Data acquisition ends automatically when the laser profiler finishes acquiring the number of profiles set in the Scan Line Count parameter.
-
-
Control Data Acquisition with MEASURE_START Only
Control the start and end of data acquisition with the signals from the MEASURE_START terminal.
Please follow the example below to connect the signal wires and provide signals for controlling data acquisition to the laser profiler.
-
Connect the signal wires of the external device to the following terminals on the controller:
-
Connect one of the common terminals for input signal (terminals 13 to 16).
-
Connect the LEVELCONTROL_ENABLE terminal (terminal 9), and keep inputting a HIGH level signal.
-
Connect the MEASURE_START terminal (terminal 10), and ensure that a LOW level signal is input before data acquisition starts (initial status).
-
The terminals on the controller are numbered. Please connect the corresponding terminals according to the number.
-
For the signal circuit diagrams, please refer to Signal Circuit Diagrams.
-
-
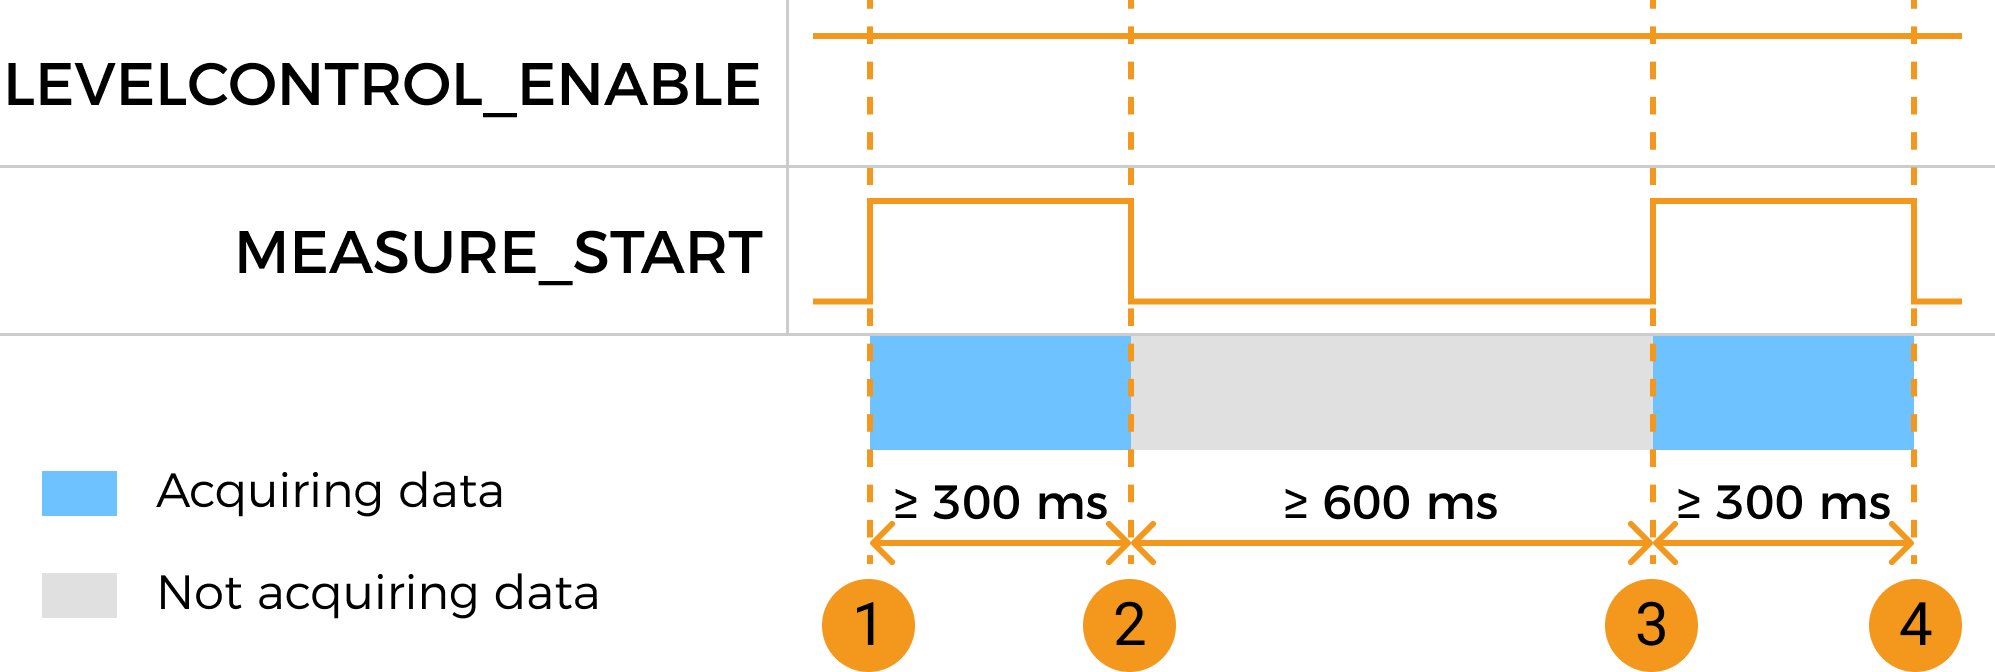
Referring to the following figure and table, adjust the logic level signal from the MEASURE_START terminal at the appropriate time to control the start and end of data acquisition:

No. Data acquisition action Terminal and signal Duration requirements ①
Start a round of data acquisition
Change the logic level of the MEASURE_START terminal signal from LOW to HIGH.
Ensure that the HIGH level of the MEASURE_START terminal signal lasts for at least 300 ms.
②
End the current round of data acquisition
Change the logic level of the MEASURE_START terminal signal from HIGH to LOW.
-
③
Start the next round of data acquisition
Change the logic level of the MEASURE_START terminal signal from LOW to HIGH.
-
Ensure that the LOW level of the MEASURE_START terminal signal lasts for at least 600 ms.
-
Ensure that the HIGH level of the MEASURE_START terminal signal lasts for at least 300 ms.
④
End the current round of data acquisition
Change the logic level of the MEASURE_START terminal signal from HIGH to LOW.
-
-
Control Data Acquisition with MEASURE_START and MEASURE_STOP
Control the start and end of data acquisition with the signals from the MEASURE_START and MEASURE_STOP terminals, respectively.
Please follow the example below to connect the signal wires and provide signals for controlling data acquisition to the laser profiler.
-
Connect the signal wires of the external device to the following terminals on the controller:
-
Connect one of the common terminals for input signal (terminals 13 to 16).
-
Connect the MEASURE_START terminal (terminal 10), and ensure that a LOW level signal is input before data acquisition starts (initial status).
-
Connect the MEASURE_STOP terminal (terminal 11), and ensure that a LOW level signal is input before data acquisition starts (initial status).
-
The terminals on the controller are numbered. Please connect the corresponding terminals according to the number.
-
For the signal circuit diagrams, please refer to Signal Circuit Diagrams.
-
-
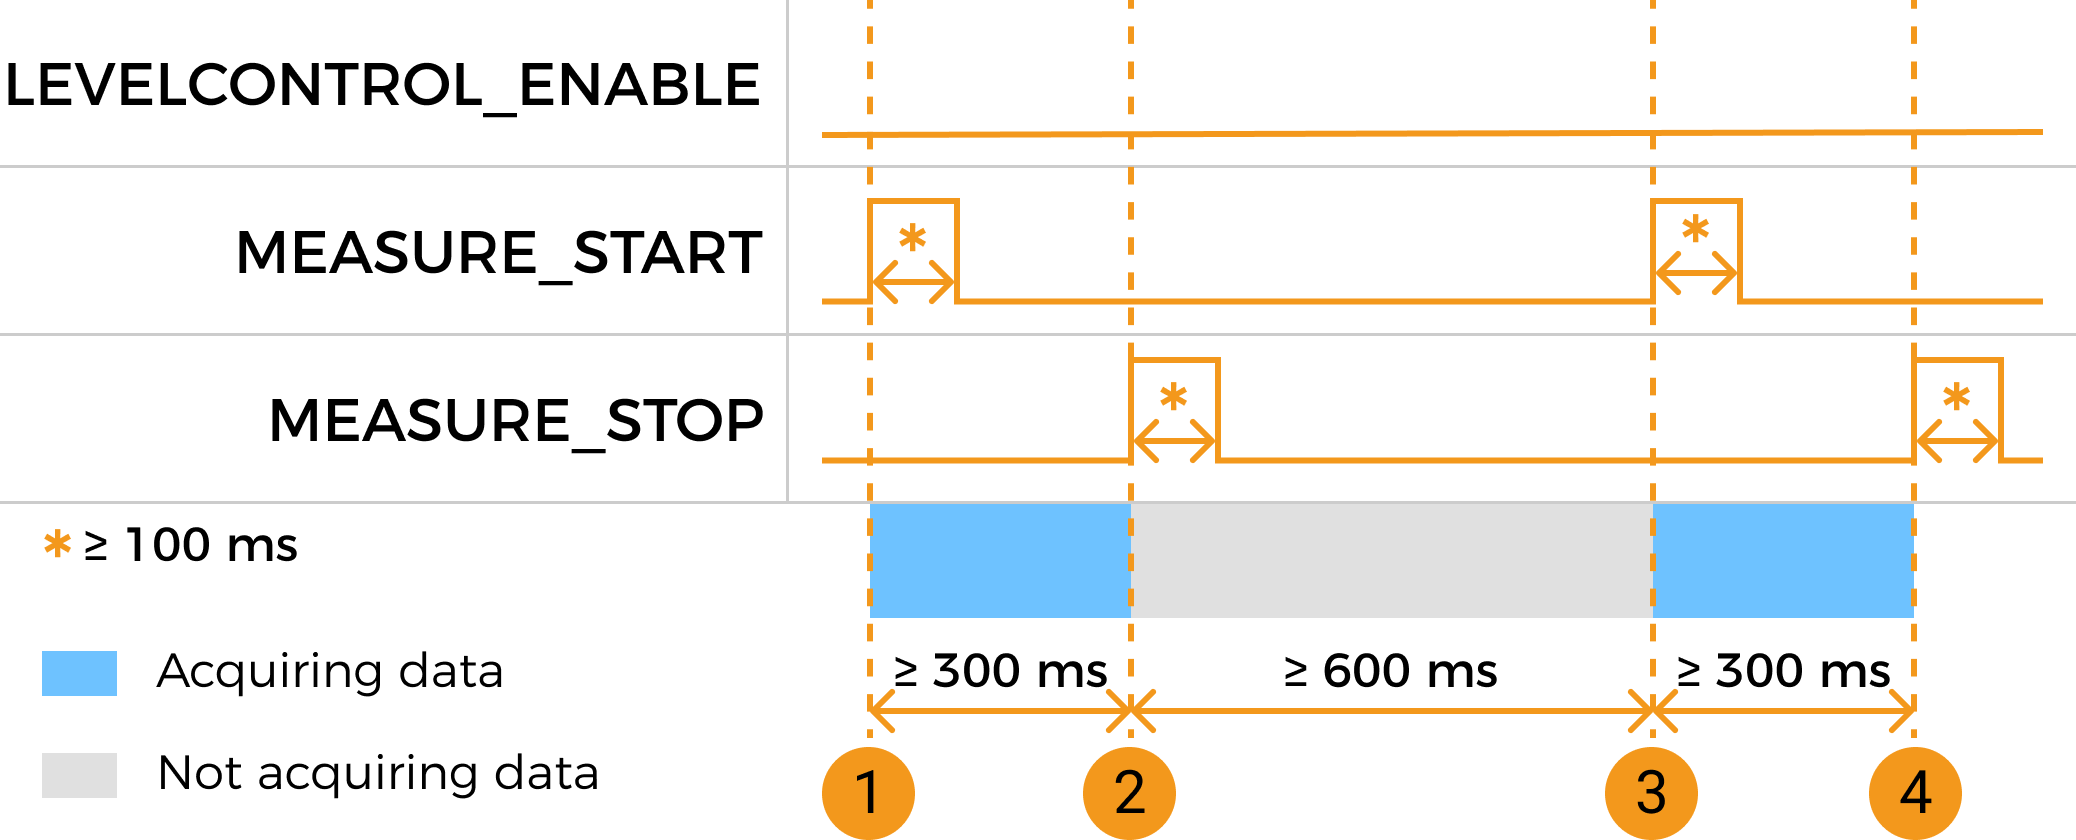
Referring to the following figure and table, adjust the logic level signal from the MEASURE_START and MEASURE_STOP terminals at the appropriate time to control the start and end of data acquisition:

No. Data acquisition action Terminal and signal Duration requirements ①
Start a round of data acquisition
Change the logic level of the MEASURE_START terminal signal from LOW to HIGH, and then change the logic level back to LOW.
Ensure that the HIGH level of the MEASURE_START terminal signal lasts for at least 100 ms.
②
End the current round of data acquisition
Change the logic level of the MEASURE_STOP terminal signal from LOW to HIGH, and then change the logic level back to LOW.
-
Ensure that the rising edge of the MEASURE_STOP terminal and the previous rising edge of the MEASURE_START terminal are separated by at least 300 ms.
-
Ensure that the HIGH level of the MEASURE_STOP terminal signal lasts for at least 100 ms.
③
Start the next round of data acquisition
Change the logic level of the MEASURE_START terminal signal from LOW to HIGH, and then change the logic level back to LOW.
-
Ensure that the rising edge of the MEASURE_START terminal and the previous rising edge of the MEASURE_STOP terminal are separated by at least 600 ms.
-
Ensure that the HIGH level of the MEASURE_START terminal signal lasts for at least 100 ms.
④
End the current round of data acquisition
Change the logic level of the MEASURE_STOP terminal signal from LOW to HIGH, and then change the logic level back to LOW.
-
Ensure that the rising edge of the MEASURE_STOP terminal and the previous rising edge of the MEASURE_START terminal are separated by at least 300 ms.
-
Ensure that the HIGH level of the MEASURE_STOP terminal signal lasts for at least 100 ms.
-
Next Steps
After selecting the control logic and connecting the hardware, please refer to Workflow of Triggering Data Acquisition and complete the other steps in order to trigger data acquisition with externally input signals.