Configure Siemens PLC Snap 7 Communication
This section introduces how to configure the Siemens programmable logic controller (PLC) Snap 7 communication. Before configuration, please confirm that you have already selected the robot and entered the communication configuration interface.
-
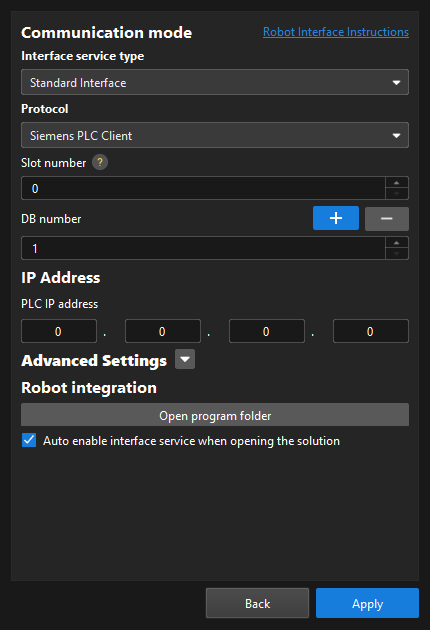
In the Communication mode section, complete the following configurations.
-
Set the “Interface service type” parameter to Standard Interface, and set the “Protocol” parameter to Siemens PLC Client.
-
Specify the “Slot number” parameter. Refer to the following table for instructions.
Siemens S7 Series Slot Number S7-300
2
S7-1200
0 or 1
S7-1500
0 or 1
Other models
0
-
Specify the “DB number” parameter.
-
-
In the IP Address section, enter the PLC IP address. The PLC IP address and the IPC IP address must be on the same subnet.
-
(Optional) In the Advanced Settings section, configure parameters as needed.
-
Max num of poses to send per time: When you use the run Mech-Vision project command, you can set the maximum number of poses that can be sent by the vision system each time. The maximum number is 30.
-
Timeout for getting Mech-Viz data (s): If you use the run Mech-Viz project command and Mech-Viz does not return the result during the specified timeout period, a timeout error code will be returned.
-
Timeout for getting Mech-Vision data (s): If you use the run Mech-Vision project command and Mech-Vision does not return the result during the specified timeout period, a timeout error code will be returned.
-
Return "1102:Successfully triggered" after the capture: In eye in hand scenarios, if you select this option, the vision system will return "1102:Successfully triggered" after the camera finishes image-capturing. This way, the robot can move immediately without waiting for the Mech-Vision project to finish running, shortening the cycle time. If you do not select this option, the robot have to wait for the Mech-Vision project to stop running before moving.
After you select this option, Timeout waiting for capture completion (s) will be displayed. If the camera needs a relatively long period of time to capture the image, specify a larger timeout period. -
Property Configuration: This button does not take effect on the selected protocol. Please ignore this button.
-
Reset: Reset the preceding configuration items (except Property Configuration) to default values.
-
-
(Optional) Select Auto enable interface service when opening the solution. When the solution is opened, you do not need to start the interface service manually.
-
Click the Apply button.
Next, you need to complete the remaining Standard Interface configuration according to the communication object.